Programming Arduino over Bluetooth
Wireless firmware updates are attractive. No wires, no broken cheap microUSB cables, no annoying grabbing in the box full cables to find the right one 😁. For one of my project I decided to implement over the air updates of firmware (or shortly OTA). The choice of wireless stack fell on Bluetooth. Actually, I was thinking how I can utilize my HC-05 modules. These are really cheap and could do a decent job for a simple wireless applications.
How bootloader works?
Let's start from some theory. Initially I didn't want to tamper with a bootloader but it seems like there is no other simpler way. So, firstly let's investigate how exactly it works and how to change it to upload data through the Bluetooth.
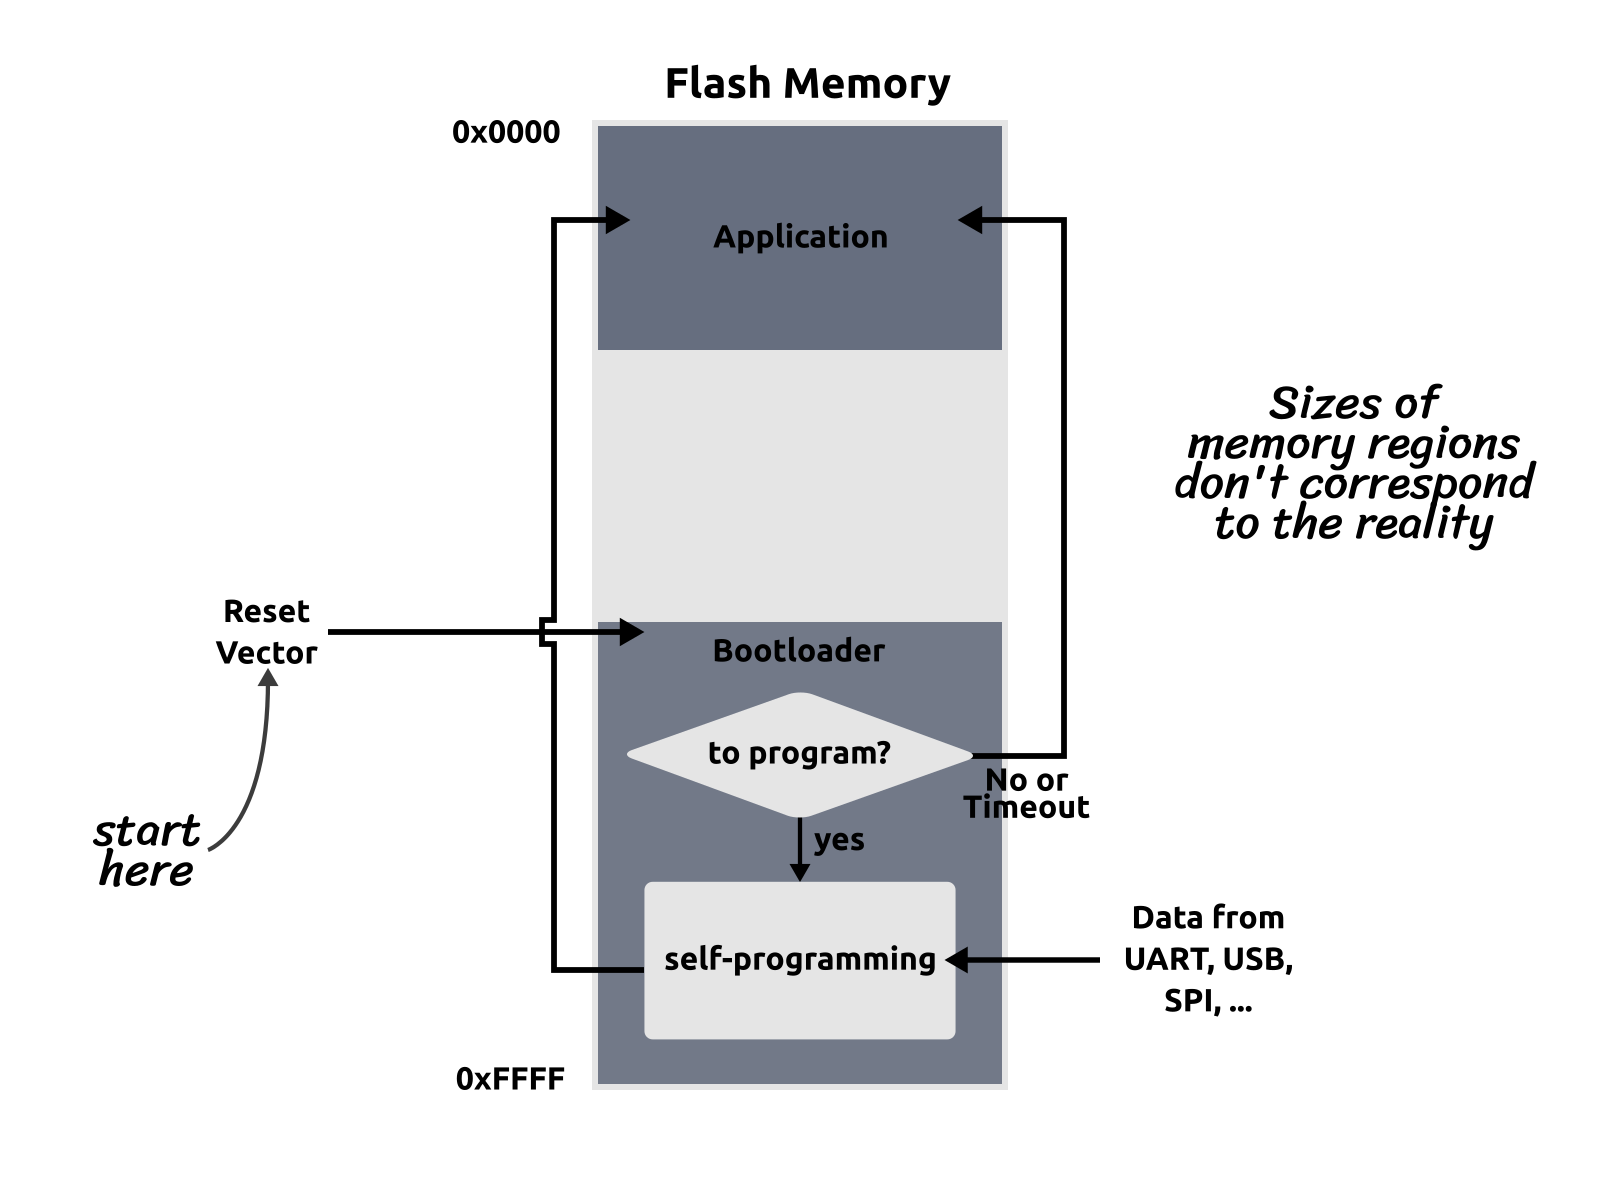
Internal memory. All microcontrollers used in Arduino have internal flash memory. This memory is used to store the code of an application and bootloader. The important feature of ATMega MCU is that flash is "In-System self-programmable". That means that MCU can updates its own memory without use of external devices. As I said there is actually two application sitting in the memory an application and bootloader.
The bootloader. It is simple application which is always stored in the flash memory of microcontroller but could be rewritten as everything else. When you power on your Arduino it doesn't immediately goes to your application, it actually starts at specific address, so called Reset vector. This address has "jump" instruction which tells microcontroller to jump to the address where bootloader is located. You can actually get rid of bootloader and jump straight to the application code but this approach has some major disadvantages.
Note: For example, one of the disadvantages is - that if your application will start updating itself and hang during the process or connection to the host will be lost - you will end up with non-working software which won't be able to update itself anymore.
The further action depends on the bootloader. In most cases it starts with setup of essential peripherals such as communication interface. Next, it starts waiting for the data on this interface. This is the moment when PC starts sending bytes to the Arduino. Actually there is the whole communication protocol - you can find more details in the official specification STK500. The bootloader receives data from the PC and writes it to the memory. After communication is complete bootloader jumps to the address where application is stored. From now on, MCU is in control of the application.
Does it have to be serial/USB?. No, it does not! It could be anything - memory chip, USB, wifi or even LoRa (wouldn't use this one for firmware updates 😁). Basically, you can get your newest fancy firmware from anywhere. On most of the Arduinos there is USB to UART controller which give us possibility to talk to the microcontroller via USB port. But, we can connect our microcontroller to any communication interface. So, how we can exploit it? The HC-05 is Bluetooth module which supports "Serial Port Profile". That means that those modules emulates a serial port over Bluetooth 😀. FYI: There are many more different Bluetooth profiles.
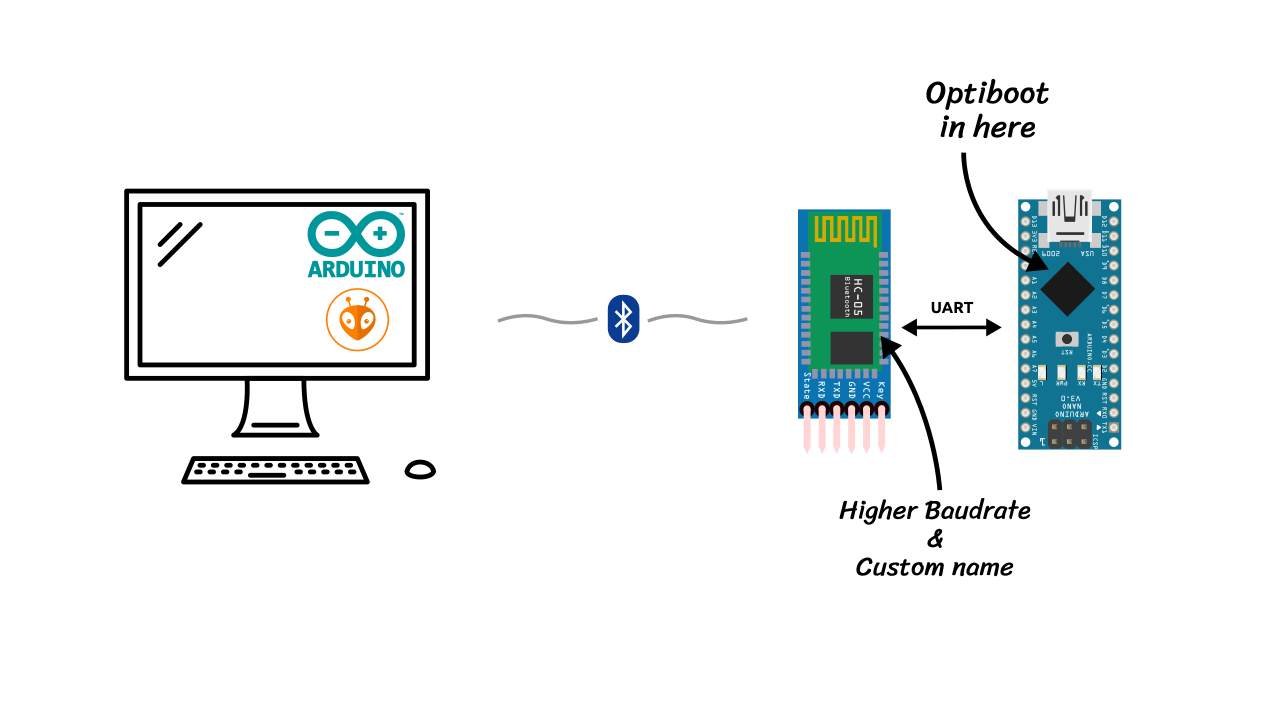
The plan. There are some articles on implementation of the "Over the Air" updates based on combination of Arduino and HC-05. In this post I describe realization which needs only one soldered wire to the HC-05. However, before uploading new firmware you need to press a reset button to reset the board. It can be seen as a completely wrong as it's much more convenient to have everything automatic. But, it is super easy to setup and I see it as a security features (not a restriction👌), as to upload firmware to the device you need physical access to it, so nobody else can do it.
Over-the-air updates preparation
The setup is following - Arduino is connected to the Bluetooth module. Instead
of connecting USB cable you pair your PC with HC-05 module. OS will create a
serial port which you already know how to use. As I previously mentioned, there
is need to manually reset the board. After pressing a reset button bootloader
will start waiting for data on UART. With Arduino IDE (or actually avrdude)
you write data to the Bluetooth port. The data or more precisely firmware is
read by Bootloader and stored to the memory.
To make it work we need to do two things:
- Adjust bootloader timeout to the delays in Bluetooth communication
- Configure HC-05 to communicate with Arduino by setting up correct baudrate
- Bonus: set some fancy name for the Bluetooth module
Needed hardware
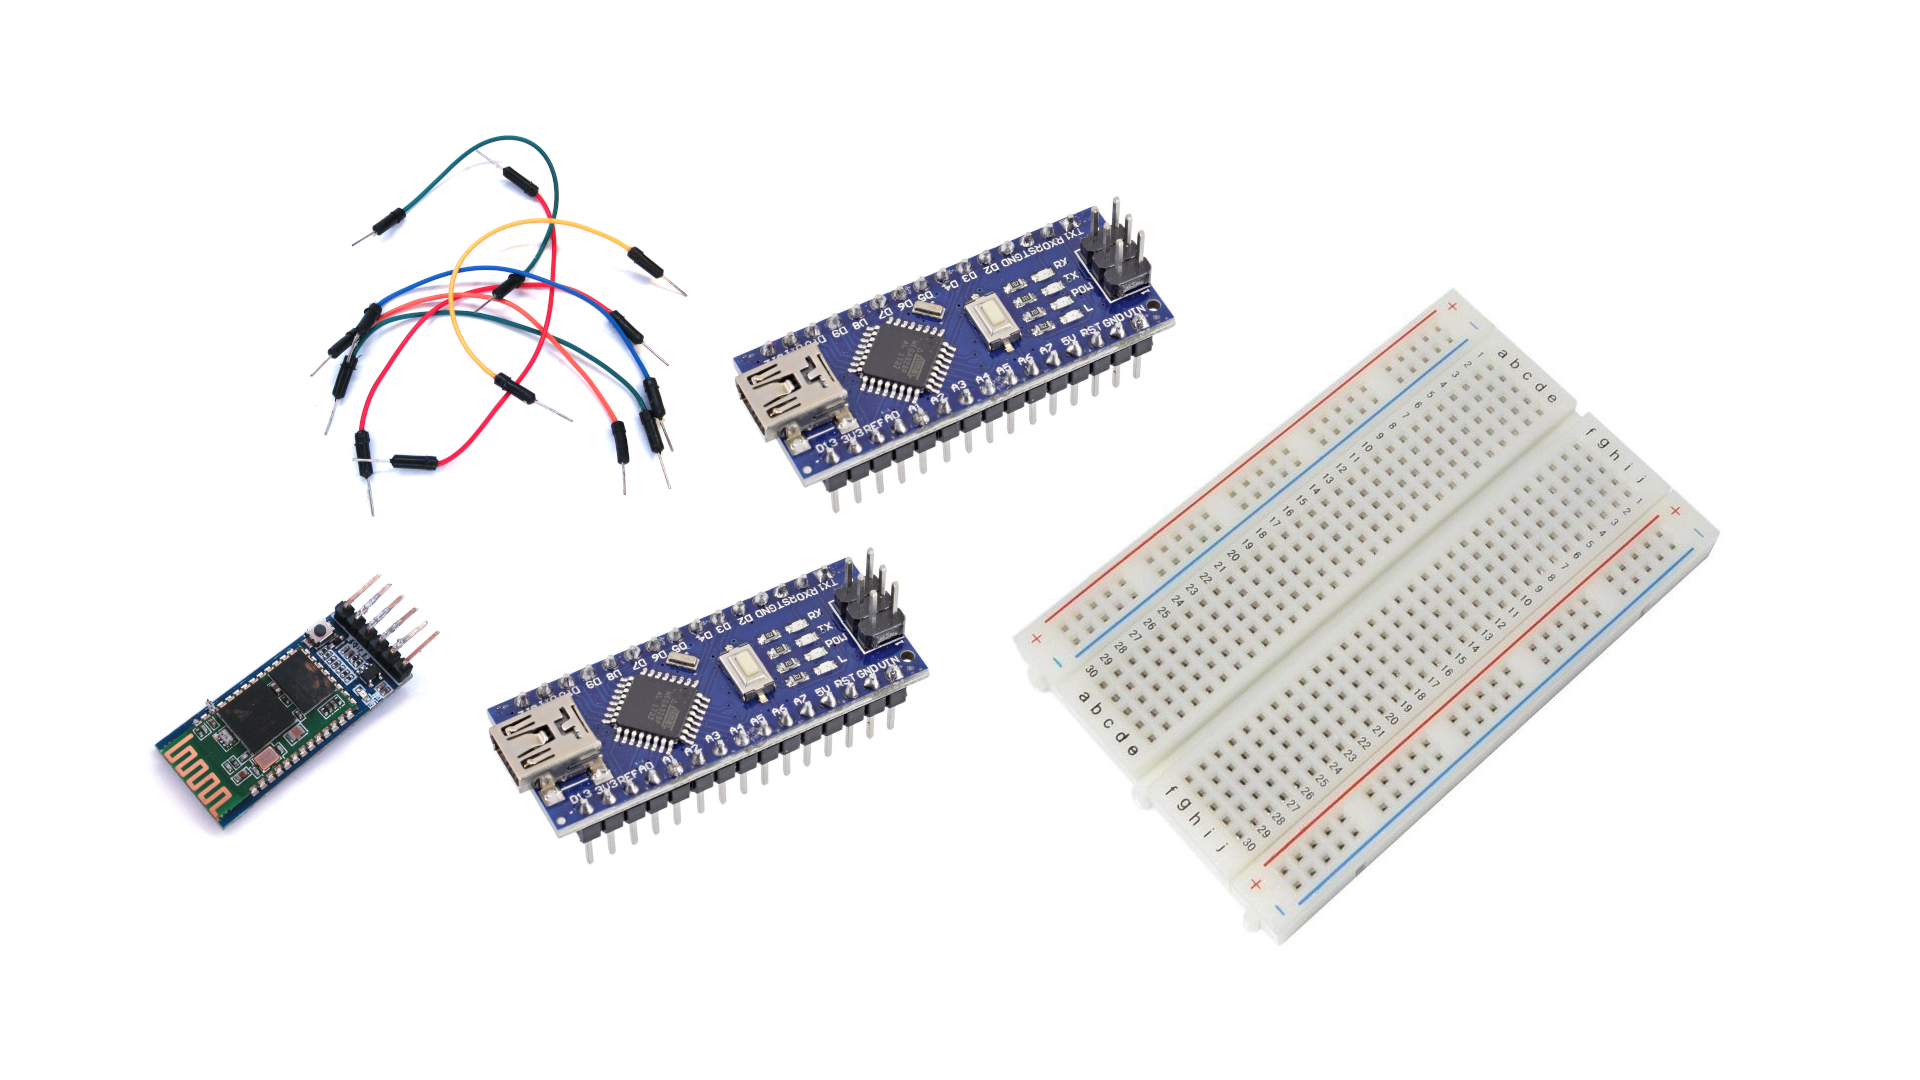
- Arduino Nano
- Arduino Nano
- HC-05 Bluetooth module
- Wires
- Breadoard
Bootloader
Setting up Optiboot
I decided to try one of the popular bootloaders with lot of useful features - optiboot. As I later discovered, timeouts have already been implemented. So, one task is done 🤔. I set timeout to the longest one available - 8 seconds.
Compile. After reading a little bit a Makefile I successfully compiled it for ATMega328p with 8 seconds timeout and 57600 baudrate. Check out official documentation for more information on how to compile Optiboot for other boards.
$ git clone git@github.com:Optiboot/optiboot.git
$ cd optiboot
$ make -C optiboot/bootloaders/optiboot WDTIME=8 BAUD_RATE=57600 atmega328
Why change timeout? The long timeout is required as Bluetooth protocol needs time to setup the connection. When you want to upload new firmware computer opens serial port attached to the Bluetooth channel. Bluetooth, in turn, tries to connect to the device. This process takes time and is much longer than UART/USB. I suppose that 4 or even 2 seconds timeouts would do the job but I didn't test it.
Bootloader baudrate. The default baudrate of the bootloader is 115200.
I've decide to change it to 57600 as it is default one for avrdude in
Arduino IDE and platformio. But that means that I need to change baudrate on the
HC-05 module, as default one is 38400.
Installing bootloader with Arduino Nano
The uploading process was a little bit tricky because all of my wires, breadboards and Arduinos are from cheap Chinese manufactures 😐. The quality is close to very bad. The main problem was loosely connection wires as they had glue on the metallic tip. So, if communication is unstable try to move around with those wires - it could be a reason why. Also, don't use the longest one.
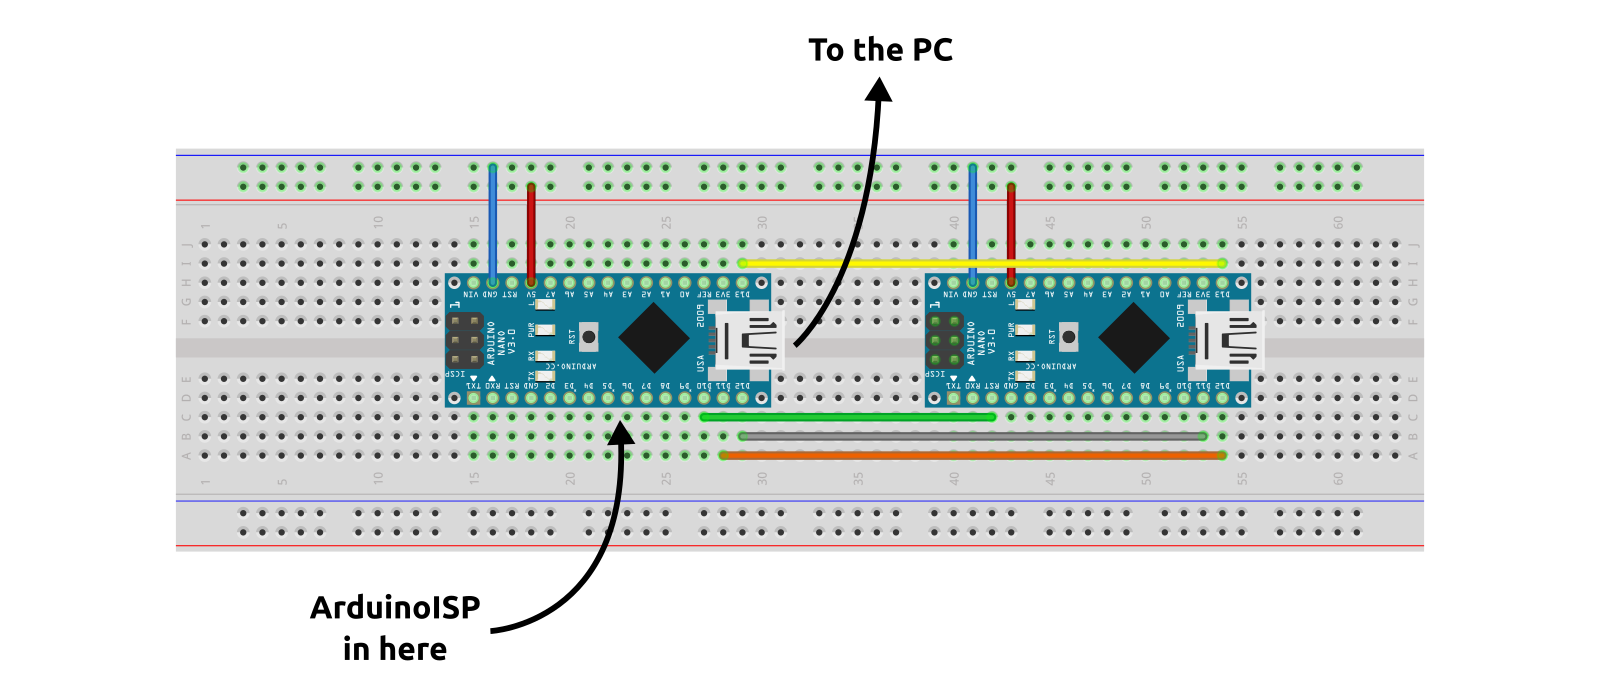
Arduino as ISP programmer. The first step is to take another Arduino and
upload ArduionISP sketch from the standard set of examples Examples ->
11. ArduinoISP -> ArduinoISP. This application turns your Arduino into a
programmer (like you heh).
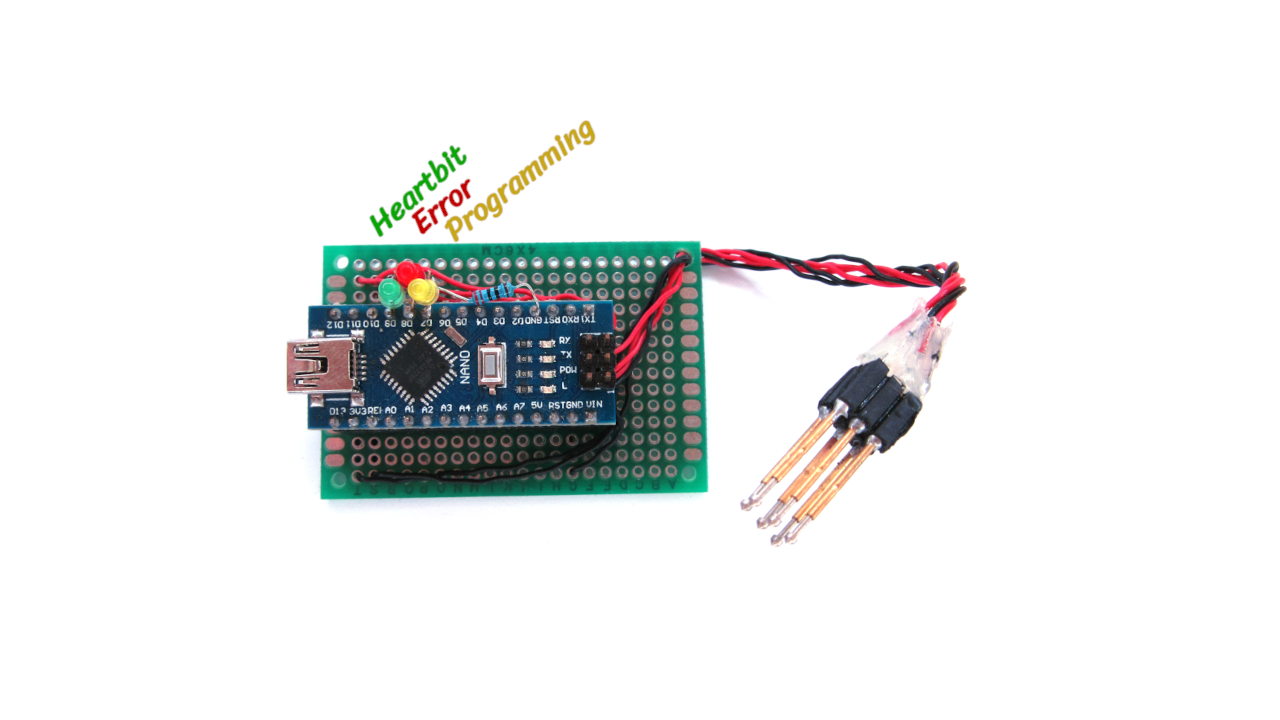
You can also add some LEDs to a programmer to see the state of uploading process. I highly recommend doing so as it helps a lot with debugging. The LEDs are connected as follows:
// Put an LED (with resistor) on the following pins:
// 9: Heartbeat - shows the programmer is running
// 8: Error - Lights up if something goes wrong (use red if that makes sense)
// 7: Programming - In communication with the slave
As I use it quite often I soldered it and now I can use it as standalone device:
How does it work? The principle is following - the ArduinoISP is connected
to the PC. Over the SPI this Arduino connects to the ICSP (those six pin put
aside) of the Arduino we want to program. On the PC you run avrdude on port
attached to the programmer. The programmer transfers commands and data to the
connected board.
Testing Bootloader
Before starting with Bluetooth let's test that bootloader works at all. Connect programmed Arduino to the PC and try uploading some firmware as usual (e.g. blink blink blink...💡). It should work as before with built-in bootloader.
Bluetooth Module
How to change HC-05 configuration
The module has two modes - one for normal operation and one for changing configuration with AT commands. Firstly, you need a serial adapter to send commands to the module from the PC.
Serial interface to the module. If you have a USB to serial adapter (something like this) I would suggest using it. But you can replace it with another Arduino with serial passthrough application.
Note: By serial passthrough application I mean the app which reads data on one serial port and send it to another one and vise versa.
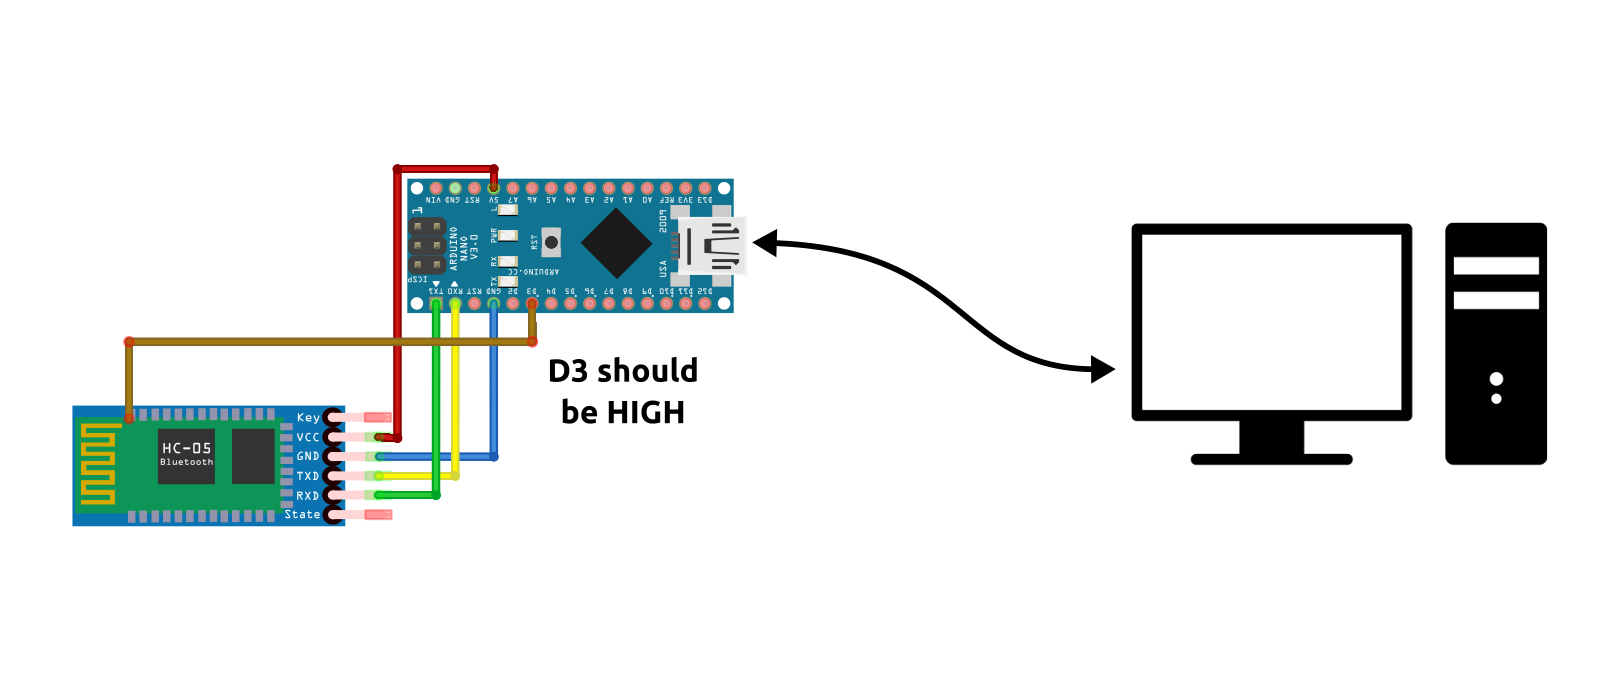
The Arduino is connected to the PC with a cable. I used Arduino Nano which has
only one serial port. Therefore, my only port is occupied by a PC. But we need a
second one for the HC-05. The solution is amazing
#include <SoftwareSerial.h>

#define BAUDRATE 38400

SoftwareSerial hcmodule(10, 11); // RX, TX

void setup()
{
  Serial.begin(BAUDRATE);
  while (!Serial) { ; }

  Serial.println("Serial passthrough");

  hcmodule.begin(BAUDRATE);
}

void loop()
{
  if (hcmodule.available())
    Serial.write(hcmodule.read());
  if (Serial.available())
    hcmodule.write(Serial.read());
}
Possibly, you will need to play a little bit with baud rate. My module had
default one 38400 but I think I saw modules with 57600. So, try both✌️..
Boot into AT mode. Connect HC-05 module as shown in the figure above. Then, turn off and turn on the module by disconnecting power wire (only module, D3 pin should stay High). If pin 34 is high, HC-05 will boot in the AT mode.
Changing configuration. Open serial monitor on your PC. The following
sequence of commands checks version of the HC-05 module, switches module to the
slave mode and sets baudrate to 57600 with 1 stop bin and no parity. There is
actually much more commands.
AT
> OK
AT+VERSION?
> +VERSION:2.0-20100601
AT+ROLE=0
> OK
AT+UART:57600,1,0
> OK
AT+UART?
> +UART:57600,1,0
> OK
You can also change name with AT+NAME=name. I created a small application
which could be easier to use if you want to configure multiple devices.
Testing Bluetooth communication
On Windows, after connecting with a Bluetooth manager, HC-05 should be visible
as COMx port. You can find exact port name in the "Device Manager". Anyway,
the port should be visible directly in in the Arduino IDE. On Linux there is a
little bit more steps to do to connect the module. I wrote the whole
article on that topic 🤨. However, if you have a decent Bluetooth chip and
drivers it should be simple.
Note: On Linux after connecting HC-05 with a Bluetooth manager it should be enough to bind it with a `rfcomm`.
Let's test that communication works at all before even trying to update
firmware. Upload the same "serial pass-through" firmware but with correct
baudrate. By the correct one I mean that which you set in the HC-05 module with
AT+UART command (57600 if you did the same).
Then, run the serial monitor on the port with Arduino (e.g. COM1 or 🐧
/dev/ttyUSB0). And another one on virtual port attached to Bluetooth channel
(e.g. COM2 or 🐧 /dev/rfcomm0).
Uploading firmware over Bluetooth
Time to try it. Prepare some simple application such as "Blink" and do the following:
- Compile application
- Press reset button on the Arduino
- Run
avrdudeon serial port attached to the Bluetooth channel (or Upload button in Arduino IDE)
It works well in both Arduino IDE and platformio. However, avrdude can't
sometimes synchronize with the bootloader and start printing errors. Simply reset
the board again and it will catch up.
Future Improvements
Updating firmware by overwriting the old one is a bad idea. If communication isn't reliable, or device unexpectedly turns off, the firmware could corrupt and becomes unusable. The better way is to use external memory chip (or internal memory if your program is small enough) - write firmware on the external memory first, then copy it to the primary location and run it.
One of the bootloader which allows this is DualOptiboot. I am planning to try this one in the next version of my Bluetooth controller. The first step will be to choose a memory chip and add it to the board.
The setup is quite simple and definitely not suitable for any device for sale. Nevertheless, there is amazing article on the Interrupt blog which lists much more details on how to build reliable firmware update mechanism.
